Thomas Doukinitsas
Showing posts with label Year 2. Show all posts
DANCE VIDEO: Working on the set of "Elysian"

DANCE VIDEO: Working on the set of "Elysian"

Other than our dance video, i had the fantastic opportunity to work on the set of Laura, Lauren, Katherine and Mollies group film "Elysian" as a Camera Operator.

I was called in as most of the group already had roles (Laura and Mollie co-directing, Lauren producing and making sure everything goes to schedule, and Katherine filming behind the scenes) and big rig such as the EX-3 combined with a glidecam needed it's own crew to handle it.

Setting up the camera was easier this time as we had already done the same rig for our own shoot.

Both me and shahid worked under the strict direction of Laura in order to get the shots that she and mollie imagined. Something that i learned on this shoot was to carefully listen to directions, but also suggest ideas that may fix problems on set.

One of these problems was the lighting. Since the group had originally imagined the lighting as backlit, they tried it out but the light was clearly visible. It was my suggestion then to add two blue lights behind the actors, one off camera at the left and one off camera at the right. This quickly solved the backlighting problem and allowed the group to carry on with the shoot.

Overall it was a very fun experience, and it was nice to work on such a different shoot then ours. Definitely worth it even just for this photo...:


DANCE VIDEO: Evaluation and Reflections

DANCE VIDEO: Evaluation and Reflections

During this project i had to learn some things the hard way, especially during the post-production process.

The first thing i learned was that the "We'll fix it in post" attitude is bad practice and SHOULD BE AVOIDED AT ALL COSTS. During the shoot as a visual effects supervisor if i had just asked around for a black cloth to put on the floor we could have avoided so many of the masking shots, freeing up time for the more important sequences such as Amelia passing through the mirror. Therefore next time if i ever am a visual effects supervisor instead of thinking how things could be fixed in post production i will try and think of ways of avoiding visual effects for silly things.

The second thing that i could have done better was enforce a final cut from the beginning before we started the visual effects. Even though i know this would be hard since we got our feedback in the middle of the edit, and we had such a tight shedule, it would have saved allot of time and avoided allot of stress during the last few days of post production.

Lastly i would like to apologise to the entire team for being late on multiple occasions during post production (coming in at 12pm instead of 10am), and although thankfully it didn't affect the work it was extremely unprofessional of me and in the industry such behavior could have been extremely damaging. Amazingly after realizing this, i managed to come in 9:50am sharp for all of the other days!

Overall though i am extremely happy with how this project developed from a quick idea that came up during a dance workshop. As a team we have managed to bond very well and figure out how to work together, and i really enjoyed the concept of experimentation throughout the entire process. This experimentation leads to ideas being generated quickly and most of all... allot of fun!

Our dancer was an absolute pleasure to work with, and i hope that in the future we work with talent that are proactive and are willing to contribute their own ideas to the project.

As a camera operator i got to work on two shoots including ours, with some great gear and learn from first hand how rigorous and hard a shoot can be, and how to react quickly to situations.

Post-Production was an amazing experience, and despite the problems and long hours, i felt comfortable in such an environment and believe that i would be happy in a post-production career.

So... after all of that i am proud to present the product of our hard work:

DANCE VIDEO: The Shoot

DANCE VIDEO: The Shoot

Shoot day, finally here!

SETTING UP:
Our day started with getting all of the equipment in to the room and setting up the space. As me and shahid were setting up the camera, blade and glidecam Lucy went to greet Amelia and bring her in to the room.

We also had Laura, Lauren and Katherine helping us out with things like makeup, timing and lighting.

Setting up the camera was pretty straightforward since it was all ready and prepared from the previous day, when we all picked up the equipment and formatted the cards.


The glidecam however was allot trickier. Balancing the weights and the camera is extremely tricky and requires allot of time, therefore we couldn't fully set it up at the start. Thankfully we had planned for the glidecam shots to be filmed after the lunch break, so we could continue setting it up then.

The lighting was a pretty simple set up, but we had to make sure that we recorded the lighting change for each shot change to maintain continuity.


THE SHOOT:

Once everything was set up we started with master and mid shots of the entire dance from both the manipulator's and manipulated's performance.

The camera was locked off for these shots as they are intended for a split screen composite of the two elements.

To maintain the spirit of improvisation the dancer was given a song and some keywords (body parts, bones/muscles, sections), and they improvised movements based on those combinations.

To time and synchronise the dancer we noted down the time that each keyword was said. Then for the next take they were repeated in the same order

We then did some frontal shots and closeups with a combination of handheld and locked off shots.

Our philosophy was that the dancer was confined to the frame, therefore the camera would not move and trap their performance.
When the dancer was more fluid and could break out of the restrictions of the frame, the camera would now follow the movements.

To assist the dancer in knowing where the frame was we used an extra monitor pointed to them. This gave them a good reference point and allowed them to experiment more. Personally i liked moments where the dancer was aware of the edges as a physical frame and tried to touch the borders.

We also did a few shots on the greenscreen for some of the more complicated composite shots.

Tracking markers were added to assist in matchmoving both takes, due to the fact that we didn't have a complicated rig that could perform the same movement twice.

Even though on some of the takes background objects are visible due to the limited setup time we had, i am confident that since these shots will only appear for a short amount of time, they can be digitally erased, and the dancer can be isolated.


I also placed a line between the two halves in order to have a reference point for the mirror.

Lastly, after we had shot everything on our shot list, we decided to use our remaining time to experiment with different lenses, camera angles and slow motion.

We ended up shooting almost two hours of footage, and i believe that that's more then enough material to use.

REFLECTIONS:

Overall i was really happy with our shoot, and although i would have wanted an extra shoot day, i believe that we can work with everything that we've got, and i have allot of confidence with my team.
I was also happy that we managed to get extra help, because without it our shoot would have been much more tedious and difficult.

Amelia was an amazing find by Lucy, and i'm extremely grateful that i managed to work with someone so keen to collaborate and share their ideas, i believe all projects should have this collaborative nature, as they are executed allot smoother and have a fun shoot.

I would have maybe liked to get more of the greenscreen set up, but unfortunately every production has to work to a limited schedule, and every production that we've made further shows this to me.

Conclusion: would shoot a piece like this again any day :)

INTERACTIVITY: Further Developing the Game

INTERACTIVITY: Further Developing the Game

The first thing i decided to implement was a 360 degree sky, this would allow me to use a perspective camera, and implement a few cinematics. The first thing i did was make a texture matte painting in photoshop.

Because i wanted to have a 3D scene with a free moving camera, i had to create a skydome.
However, since all surfaces are one sided in unity, i had to invert the normals. Then i just exported the model as an FBX.


The mesh was then imported and a unlit textured material was added

Also, the lights were changed to reflect the new background:


Animations were added to the camera, and animation changes were called through the script using the CrossFade function (found through the Unity API website)


After this i decided to create an introductory cinematic. I created a new scene, added my objects and then added individual animations to each object. I also created a "Start Game" 3d object in Cinema4D, and baked the textures on to it to make it easier to import.


When i imported it i attached a script to it so that when it was clicked on or touched it triggered the animations.

Also, to load the main level i created a script that used two gameobjects and their colliders, so that when they hit eachother, the level stored in the script's variable would be loaded. These two objects would collide at the right time using an animation.

I further went on to add some image effects imported from Unity's built in libraries. The main ones i used was Depth of Field, Chromatic Abheration, Vigniette and Lens Flares

In the main level i also added a highscore script. This was done by comparing the Score to a HighScore variable, and then if the score was bigger, it would be assigned to the highscore. The key to making this work properly was to make the HighScore variable a static variable, so that it wouldn't reset when the game restarted.

After testing out the early versions of the game, i found it quite abrupt when a cinematic would finish and the game would start. Therefore i decided to add a screen that would state some controls, objectives and a rough storyline. This was done using a simple quad in a new scene. A script was added to this quad to load the correct level when the mouse was clicked


Another cinematic was created to introduce the boss fight, and it was made in a similar way to the previous one. I changed the sky to a darker red color to indicate a scene/difficulty change. Also during the cinematic a transition texture is used to help transition between levels.

The boss fight level uses a MathF.MoveTowards function so that the enemy follows the player on the x axis, but with a delay.

Further modificatons were made to a copy of the GameController scripts, and some other custom scripts to make the enemy bolts kill the player, make them shoot in intervals, make the player bolts cause damage to the enemy ship, a health variable for the enemy and another text object to display the enemy ship.

Lastly an Ending level was added with an explosion to indicate that the enemy ship had been destroyed. However the builds may have a bug that causes that level not to load (whilst in the editor it works fine)

I also added some basic touch controls for the Android build, however they are sill buggy and need improvement.

This is what the final game looks like:


And this is what the mobile version for Android looks like:

SELF-EVALUATION
Overall it was an interesting experience and extremely valuable learning how to script in C# as i previously felt uncomfortable with it, and it has put me off using game engines such as Unity or UDK. Now i feel a bit more confident with this area and feel like i will be experimenting with game engines allot more in my spare time. The shooter game i created still has a few bugs that need to be worked out, but for the amount of time we had considering we have other projects running in parallel i'm happy with the result.

DANCE VIDEO: After Approval and Before the Shoot

DANCE VIDEO: After Approval and Before the Shoot

ROOM SCHEDULING:
Booking out rooms has been the definition of a logistical nightmare...

Originally we had booked the 25th of may for g27 with a full equipment list, and two extra days for an audition and a rehearsal in classrooms.

However, despite our early panning we had to work in conjunction with Laura, Lauren, Katherine and Molly's group who desperately needed a studio, to completely rearrange all of our bookings due to all the studios being fully booked.

As a space appeared on the 20th, the underwater dance group couldn't take that space due to their dancer. However, as we could we decided to swap our slot with theirs.

This posed another step of confusion as our equipment bookings had to be swapped over. Luckily we booked roughly the same equipment. However during the process we did lose a couple of sandbags and a c stand.

Also, since Dowan needs a camera for Friday morning, i've offered to swap the EX-3 that we need in exchange with my personal 600D. I'll be giving him a few tips and tricks on Thurdsay for how to use extra software that i've installed on it.

CASTING AND AUDITIONS:

After receiving replies for our film we did two skype auditions and one physical audition. During the auditions we asked the dancers what they would like to input to the project, and also some of the more practical things such as availability.

This is some of the footage we shot during our physical auditions:


We decided to cast Amelia Emma Forest for her contemporary dance skills and enthusiasm for the project.

During our Skype conversation we talked allot about collaboration, and how each art form could feed in to each other.

We also went through allot of the ideas of the film, and how we'd like to structure it.

Overall, as a group we are extremely happy with Amelia, and believe she is a strong motivated individual fit for the part.

REHEARSAL AND MOVEMENT TESTS:
On Monday we booked a room to meet and greet our newly cast dancer, and to try out a few things such as movement, visual effects and costume. This is the result of that day:


VFX TESTS:
To test out some of the more complicated shots we decided to shoot visual effects tests for the pass through mirror shot, but also for the duplication shot.

The way i'm going about creating the mirror shot is using a bunch of adjustment layers in combination with the displacement map effect to create a mirror/glass look. Then the elements that are passing through the mirror are rotoscoped and put above the adjustment layers. The edge of the matte is used to further distort the areas where Amelia is passing through the mirror, as if she is bending reality. My conclusion to avoid needless extra roto work is to shoot it in front of a greenscreen


For the duplication shot, it's just a case of matchmoving both shots and creating a split screen mask.


CALL SHEET:

I also created a simplified call sheet to schedule our shoot, and gather our equipment list and contact details in one place:

DANCE VIDEO: Getting Pre-Production Done

DANCE VIDEO: Getting Pre-Production Done

Well... this has been a busy month...

To start off, as a group we have a synopsis and a treatment, written by Lucy:

Synopsis

This collaboration between contemporary dance and film will attempt to convey the emotions associated with oppression through the combination of repetitive sequences and improvised movement as well as an exploration of the reflection on the self through the use of mirrored images, colour, and lighting to create a loosely narrative based piece which will see our dancer travel from a point of complete submission to one of emotional and physical freedom.

Treatment

This film follows the basic idea of attempting to convey oppression through movement. The dance will begin from a state of submission to the ‘norm’ with repetitive actions, and evolving throughout the film to a state of full creative expression. The idea stems from the desire to play with the evolution of dance from one state to another, and to play with mirroring and time. The idea of oppression comes from the ever present negative feelings in society towards creative degrees and career choices that both ourselves as film-makers and dancers may experience alike.

The film will begin with a continuous repetitive sequence of a few actions which are rigid and expressionless. The dancer will be repeating these mindlessly in front of a mirror. The mirror image will eventually become wise to these motions and act as a catalyst for change in the dance. The mirror will begin to affect the real life image by adding movements into the sequence and attempting to get the attention of the real person. The real person will eventually become fully aware of this ‘other person’ and then become aware of their own situation. This will allow the real person to break free from these repetitive actions into completely fluid motion.

Our production design is taking a minimalistic approach, as we do not want to be too literal in our relation to real life. Therefore we are designing our set around opposition of colour, attempting to represent either side of the mirror using different colours or tints to distinguish between the two. Our lighting aims to be a mixture of light and shadow using only one or two lights on our subject to create a moody atmosphere, yet lighting our subject softly to enhance the shapes and movements made through the dance.


Our soundtrack aims to focus on the movements in the dance. We have decided to mostly use the movements of the dancer to create the soundtrack, using the repetitive actions to create rhythm and using also the breathing and sounds coming from clothing etc. This type of sound design draws focus to the subtle movements of the dancer and gives the film a personal edge, and draws attention to the evolution of repetitive motion we are trying to create.

TUTORIAL WITH VICKY:

Also during our tutorial with Vicky after she had given us some very useful visual refrences, such as "Dancer In The Dark" by Lars Von Trier, or even "Modern Times" for it's mentality, she pointed out a few things that i found very important as the camera operator:
  • Try using the framing to internalise his restrictive movements
  • a thought may be for the first half to let the camera dictate the movements
RISK ASSESSMENT:

As a co-producer, i agreed on filling out the risk assessment, and examining the possible hazards of the project. What i found possibly dangerous was:
  • The lights and any other electrical equipment
  • Cables and a messy workspace
  • Physical Strain on the dancer
  • possibly a mirror, if it gets used (probably won't, but i put it in just in case)
After listing all of the measures used to protect the cast and crew, the risks seemed relatively low thankfully.

Also during this process i gathered the crew's contact details. The dancer hasn't been added yet as she hasn't been cast, but i'll fill that in before production starts.

ROOM BOOKING, EQUIPEMENT AND PRODUCTION MANAGEMENT:

Very early on as i knew rooms would be booked relatively quickly due to high demand, i went on and booked a suitable studio space with green/black screens on the 25th of March for the entire day.

I also put together a list of equipment after meeting up with the group for a discussion of our requirements.

We opted for the Sony EX-3 as we have previously used this camera, and because it has a clean, uncompressed signal using the Samurai Blade, which is a very important thing for green screen compositing

We also got a rode ntg microphone as we are heavily basing our soundtrack off of natural sounds.

Lastly we booked lights, stands and tripods as per usual.

Today i also booked classrooms for rehearsals for two days, to give practice time for us without wasting studio space.

At the moment we are considering using the glidecam for a few shots, but we are going to wait until our induction until we book it.

We also thought ahead and have booked three weeks of post-production using the Avid facilities on campus.

PROJECT PROPOSAL:

To present our project i've decided to compile a project proposal using inDesign, bringing together the following:
  • Synopsis
  • Treatment
  • Production Management
  • Equipement List
  • Mood Boards
  • Storyboards
  • Shot List
  • Risk Assessment
  • Individual Learning Agreements

INTERACTIVITY: Asteroids

INTERACTIVITY: Asteroids

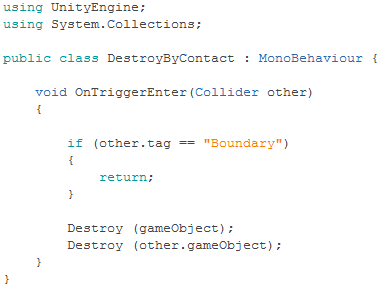
Starting off this workshop, we created a new script to destroy an object upon contact.

The script at the beginning looked like this:

However, since the OnTriggerEnter is checking for all collisions, the asteroid dissapears instantly. To fix this the script was modified as so:

also for this script to work we added a tag to the asteroid object

to create an explosion we further modified the script using the Instantiate function, and added an if to check weather the player is colliding with the asteroid or not:

After we checked that the asteroid is working as it should, we made a prefab with it and deleted the original object from the game.

We then went on to create an empty game object to use as a Game Controller.

We added as script to that to spawn the asteroid in the game

Although this spawns the asteroid in, since there are no position values set it defaults to 0,0,0
By doing this the asteroid spawns on top of the ship, therefore causing both to... spontaneously combust o.O
Ship goes boom :P
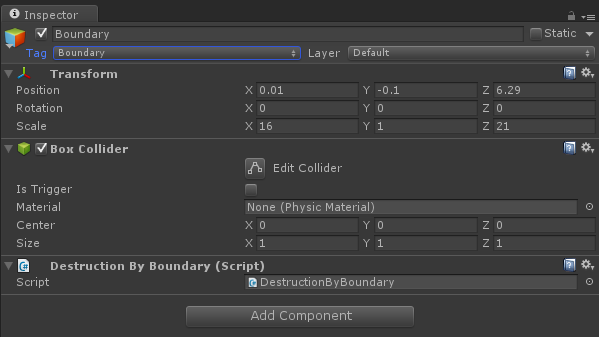
The next step is setting a boundary and positions for the asteroid to spawn in off screen.

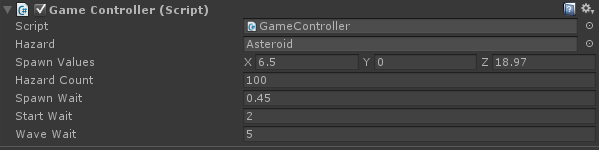
To do this we modified the script to this:


now to make the asteroids spawn multiple times we added to the script

also to loop the waves the script was further modified


INTERACTIVITY: Shooting and Asteroids

INTERACTIVITY: Shooting and Asteroids

To start this session we wrote the script to move the bullet

after a changing the value in the inspector, the bullet moves across the screen

after getting the bullet ready we created a PreFab and moved our bolt in to that.

Now to get the bolt to spawn we created a point for the script to reference

We then opened up the PlayerController script and added the following:

The next step was to link the objects to the script using the inspector

By adding a small function in to the script and linking it back to the variables, we get our bullets being spawned... maybe a bit too much.


Also to fix the physics colliding with eachother, "Is Trigger" must be checked in the Rigid Body component of the prefab.

To make the bullets only fire when the mouse button (or fire button) is pressed we modified the code:


After adding some more code modifications, especially trying to get both guns to shoot this is what i ended up with


Now, in order to destroy the bullets when they exit the screen, we created a boundary

The next step was to add the asteroid in. After i imported the model i made in the 3D workshop i added the Rididbody and Capsule Collider components, and added a new script to the container.
This is the script that was written:

This added a random rotation to each instance of the asteroid.
Dat Tho...

3D MODELING: Asteroids & Enemies

3D MODELING: Asteroids & Enemies

During our second workshop we started off with modeling a series of asteroids for our Game


These started off as basic spheres and cubes, deformed using the vertex tool using a soft selection.
An important part in this process was the smoothing of normals to eliminate hard edges (Normals > Soft Edges)

After the base mesh was done i made a texture in photoshop.


The reason i made two textures is that i wanted the lava to be illuminated separately from the lighting situation, therefore the texture is going to be assigned in to the "Incandescence" channel of the blinn material.


Also the incandescence channel can cast a glow in the render... how cool is that? :P


At this point i had to play around with the UV mapping of each asteroid to avoid certain wrapping issues as seen below:


The best way to wrap the texture seemed to be creating a cube, creating a spherical UV map and then deforming it. This is the final uv that i ended up with after a tiny bit of cleaning up:
The next step is to clean up the already existing material to better fit the new UV's
Using the liquify tool i tried to bulge the texture slightly so that it better follows the wireframe

I also used the clone tool and the paint tool to better cover the edges.

After applying the new texture, it looks like there are no edge issues

During the second part of the lesson we were asked to build another spaceship, this time to be used for the enemy.


This time i decided to actually draw a mock up design, going for a deep red scorpion inspired organic shape, to seem more like an alien ship.

By using the box modelling techniques we learned i modelled half the spaceship in a rough form.


After that using various different projections i tried to lay out the UV's to get the model ready to map.


Also to get the organic shape i was looking for i smoothed the mesh, and then duplicated and joined the mirrored half to complete the shape.

To texture the ship, i added a base color and texture and then painted in small details

After also adding a incandescence channel, and tweaking a few things this is the final ship:

All and all, all the models together seem to work well together
This is the final enemy ship model (the mesh error is part of the web viewer, not the model)