Thomas Doukinitsas
Showing posts with label Professional Toolkit. Show all posts
INTERACTIVITY: Further Developing the Game

INTERACTIVITY: Further Developing the Game

The first thing i decided to implement was a 360 degree sky, this would allow me to use a perspective camera, and implement a few cinematics. The first thing i did was make a texture matte painting in photoshop.

Because i wanted to have a 3D scene with a free moving camera, i had to create a skydome.
However, since all surfaces are one sided in unity, i had to invert the normals. Then i just exported the model as an FBX.


The mesh was then imported and a unlit textured material was added

Also, the lights were changed to reflect the new background:


Animations were added to the camera, and animation changes were called through the script using the CrossFade function (found through the Unity API website)


After this i decided to create an introductory cinematic. I created a new scene, added my objects and then added individual animations to each object. I also created a "Start Game" 3d object in Cinema4D, and baked the textures on to it to make it easier to import.


When i imported it i attached a script to it so that when it was clicked on or touched it triggered the animations.

Also, to load the main level i created a script that used two gameobjects and their colliders, so that when they hit eachother, the level stored in the script's variable would be loaded. These two objects would collide at the right time using an animation.

I further went on to add some image effects imported from Unity's built in libraries. The main ones i used was Depth of Field, Chromatic Abheration, Vigniette and Lens Flares

In the main level i also added a highscore script. This was done by comparing the Score to a HighScore variable, and then if the score was bigger, it would be assigned to the highscore. The key to making this work properly was to make the HighScore variable a static variable, so that it wouldn't reset when the game restarted.

After testing out the early versions of the game, i found it quite abrupt when a cinematic would finish and the game would start. Therefore i decided to add a screen that would state some controls, objectives and a rough storyline. This was done using a simple quad in a new scene. A script was added to this quad to load the correct level when the mouse was clicked


Another cinematic was created to introduce the boss fight, and it was made in a similar way to the previous one. I changed the sky to a darker red color to indicate a scene/difficulty change. Also during the cinematic a transition texture is used to help transition between levels.

The boss fight level uses a MathF.MoveTowards function so that the enemy follows the player on the x axis, but with a delay.

Further modificatons were made to a copy of the GameController scripts, and some other custom scripts to make the enemy bolts kill the player, make them shoot in intervals, make the player bolts cause damage to the enemy ship, a health variable for the enemy and another text object to display the enemy ship.

Lastly an Ending level was added with an explosion to indicate that the enemy ship had been destroyed. However the builds may have a bug that causes that level not to load (whilst in the editor it works fine)

I also added some basic touch controls for the Android build, however they are sill buggy and need improvement.

This is what the final game looks like:


And this is what the mobile version for Android looks like:

SELF-EVALUATION
Overall it was an interesting experience and extremely valuable learning how to script in C# as i previously felt uncomfortable with it, and it has put me off using game engines such as Unity or UDK. Now i feel a bit more confident with this area and feel like i will be experimenting with game engines allot more in my spare time. The shooter game i created still has a few bugs that need to be worked out, but for the amount of time we had considering we have other projects running in parallel i'm happy with the result.

3D MODELING: Ufo and Animation

3D MODELING: Ufo and Animation

To start off our last session we created a spaceship out of a cylinder using the extrude tool and the insert edge loop tool. I also used the soften edge tool to smooth the more spherical surfaces.


I also added some further detail for some possible lights at the outer rim of the spaceship

The next step was to UV map the model. Using a combination of Planar and Cylindrical Mapping i managed to efficiently map the faces

After exporting the uv snapshot i painted the textures in photoshop
and then applied them using a blinn material in maya
We also added a specular map to control how the object shines.

Also to add detail to our model we created a higher poly mesh with some extra details, and then transfered it to the lower poly mesh as a normal map

This is what the final model looks like:

To finish our lesson, we learned how to do basic keyframing, and how to use the graph editor to make a looping animation of our ship spinning


INTERACTIVITY: Audio and Score Text

INTERACTIVITY: Audio and Score Text

To start off we created a quick script to destroy our explosion prefabs after they've exploded


Next it's time to add some audio to our game. This is done with an audio source component since we have a 2D game


We added these to our explosions, and chose "play on awake" to play the sounds as soon as the explosions are spawned in

Now for our bolts it's a bit different as we have to trigger them using a script. This is done using a simple "audio.Play ();" line after the bolts are instantiated

Also we added some background music to the GameControler gameobject.

Another thing that we did was to add some score text. We did this using a GUIText component on an empty gameObject.


We added some further lines of code to the GameController and DestroyByContact to refrence the text and set up the first bit of the score code.


then we just had to trigger the event in the DestroyByContact code

Lastly we duplicated the GUIText layers twice for the restart and game over text


also we finished up the code with triggers and custom functions


INTERACTIVITY: Asteroids

INTERACTIVITY: Asteroids

Starting off this workshop, we created a new script to destroy an object upon contact.

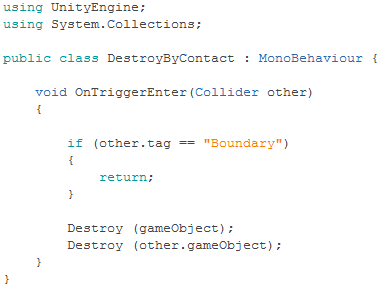
The script at the beginning looked like this:

However, since the OnTriggerEnter is checking for all collisions, the asteroid dissapears instantly. To fix this the script was modified as so:

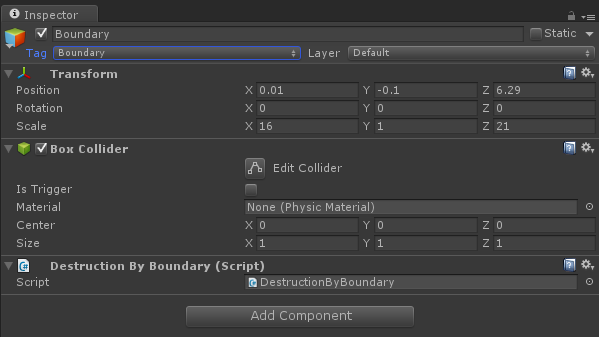
also for this script to work we added a tag to the asteroid object

to create an explosion we further modified the script using the Instantiate function, and added an if to check weather the player is colliding with the asteroid or not:

After we checked that the asteroid is working as it should, we made a prefab with it and deleted the original object from the game.

We then went on to create an empty game object to use as a Game Controller.

We added as script to that to spawn the asteroid in the game

Although this spawns the asteroid in, since there are no position values set it defaults to 0,0,0
By doing this the asteroid spawns on top of the ship, therefore causing both to... spontaneously combust o.O
Ship goes boom :P
The next step is setting a boundary and positions for the asteroid to spawn in off screen.

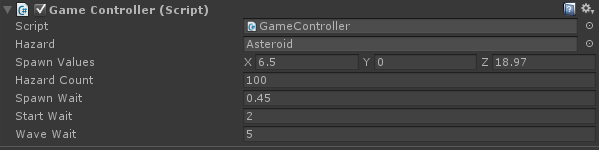
To do this we modified the script to this:


now to make the asteroids spawn multiple times we added to the script

also to loop the waves the script was further modified


PROFESSIONAL TOOLKIT: Editing the Studio Shoot in Avid

PROFESSIONAL TOOLKIT: Editing the Studio Shoot in Avid

MEDIA INGEST:

To start off the post production phase, me and Rob started to import our media and organize our bins.

The media was directly imported as opposed to AMA linking it as we wanted optimum performance during our edit sessions, and compatibility in case we needed to switch between platforms.


At this point some basic separation was done in to a main and a pickups bin.

Also i gave Rob some notes on each shot to help him out with the edit.

PROBLEMS:

At this stage however Rob encountered some major technical difficulties with his copy of Media Composer resulting in his project file and backup files being damaged, and due to some other personal matters he had to be relieved of his position as an editor.

Due to these events i had to use an old copy of the project file that only had the notes saved, in order to start again and try and complete the edit myself.

Also i learned that i had to become editor the day before we had to show a progress update to Anne. This meant that i had to try and do a rough assembly edit during our lunch break.

Thankfully as we had transcoded all the media and correctly backed up this version of the project, opening it on my own computer was not a problem.

Also, due to the fact that Rob had already marked In and Out points on most of the shots, it was pretty easy to select shots from the bin and splice them in using the V key on the keyboard.


This was the resulting timeline from that rough assembly edit


Even though this edit roughly gave an overview of the order of the shots, the pace and timing were completely off. However Anne said we were on a good track and gave some very good feedback.

She said that the shots in the beginning may need trimming down, just keeping the shots of the phone frames would be ok, and also overall trimming and pacing.

Out of our group meeting another great idea was to extend the opening shot with a long tracking from the distance to show all of the phones that the man previously had.

TRIMMING THE EDIT:

Now came time to fix the timing issues and try to get an overall good trimmed edit that ran at roughly 1-2 minutes.

I started by marking bits of clips with the in and out points, and then using the Extract tool to cut bits out. I also used the trim tool on some cuts to do slight frame cuts.

After a bit of tinkering around this is what i got:


Even though it still isn't completely refined, i have to lock it mostly now to export this edit for other things such as Visual Effects, Color Grading and Sound Editing and Mixing. The good thing is that if i need to trim down something i can still do that after everything else.

COLOR GRADING AND EFFECTS:

Before going to color grade, just to test if the green screen worked i tried using the specramatte effect on some of the clips, and saw that the greenscreen even though it wasn't perfect, it was ok to pull a decent key.

For the color grading Shahid offered to help out, therefore we went to the Avid Symphony room to continue the edit.

Now at this stage no visual effects were ready, so the grade was done using the original footage. However as it's easy to transfer effects over from clips, that didn't worry me as all i had to do later on is open up the effects editor, and drag the color corrector icon over to a new clip.

The direction i gave to shahid is that i wanted it slightly cooler, but i wanted to preserve the vibrance and warmth of the skin tones and the floor.

Overall i enjoyed seeing the results, and i thought that i would give him loose directions and correct slightly as we were going along as i wanted my colourist to have freedom in adding his own touch.

VISUAL EFFECTS:

The Visual Effects were quite an interesting challenge, as they required a number of different techniques, such as chroma keying, 3D tracking, image based modeling, and more.

One thing that was quite useful and saved me lots of rendering time was a tip i learned in the 3D workshops.

As rendering a single shot could take up to 2 days, i needed to find a way to speed up this time dramatically

I did this by "baking", a technique that allows me to pre-calculate the lighting and materials, and "bake" them in to an image that gets used as a texture on low-poly mesh.

This also meant that i could use the GPU to render the shots, since they didn't require complicated calculations any more.

This made the 2 day shot render in about 5 minutes.

SOUND:

For the sound after i got a clean ambient track and a narration recording of the ad from Ulysses i spliced them in on extra mono tracks i created.


After setting my reference tone to -18db using the Audio Tool and adjusting the levels using the Audio Mixer, to make the narration sound like it was coming from the TV i used an equalizer to cut off the highs and lows, and a reverb to give it some space.


To make the Apple inspired ad sound right, i purchased some royalty free music from audionetwork.com that resembled the apple tech demo music.

I decided that during the closeup of him realizing his mistake i wanted the audio to become non-diegetic, as if we're going in to his thought process and we can feel his intensity somehow. To do this i simply increased the volume over time using the track handles, and adding keyframes with the ' key.

Also to further balance my sound levels i added a compressor/limiter to the master track, limiting everything to -12db and keeping normal sounds roughly at -18db.

TITLES AND CLOCKS:

To create the ending credits i made a new title using the Avid Title Tool, and chose to use some simple rolling credits.

After all of the text was created and positioned, i rendered the title to my media drive, and spliced it in at the end of my project

To add the bars and tone at the beginning i imported the bars from the supporting files foler, found the clock from an earlier production and created some more titles with the information. To create a start filler with the right timecode i used the "Add filler at start command" to add 40 seconds of filler (10 for bars and 30 for the clock). Therefore the film starts at exactly 01:00:00:00.

EXPORTING:


Final Timeline

After finishing the edit fully, copying all of the color effects to the new vfx shots, and double checking everything i decided to export.

To export i used the Avid DnXHD 185 codec. I used 8 bit as the camera was not shooting 10 bit files, so that would be unnecessary.

REFLECTIONS:


Overall even though the editing process was a bit last minute, i enjoyed it and for the amount of time given i am happy with the result. If i could change something however, i would choose to communicate more with my team to avoid some of the confusion that made this project so last minute. Lastly i'm also going to attempt to continue my edit of the Silent Woods project to further gain experience in editing using avid, thankfully though i've started using avid for personal projects and so far it seems to fit in with my pipeline. Let's see how this goes...

Using avid for personal projects seems to be a good way to train myself

INTERACTIVITY: Shooting and Asteroids

INTERACTIVITY: Shooting and Asteroids

To start this session we wrote the script to move the bullet

after a changing the value in the inspector, the bullet moves across the screen

after getting the bullet ready we created a PreFab and moved our bolt in to that.

Now to get the bolt to spawn we created a point for the script to reference

We then opened up the PlayerController script and added the following:

The next step was to link the objects to the script using the inspector

By adding a small function in to the script and linking it back to the variables, we get our bullets being spawned... maybe a bit too much.


Also to fix the physics colliding with eachother, "Is Trigger" must be checked in the Rigid Body component of the prefab.

To make the bullets only fire when the mouse button (or fire button) is pressed we modified the code:


After adding some more code modifications, especially trying to get both guns to shoot this is what i ended up with


Now, in order to destroy the bullets when they exit the screen, we created a boundary

The next step was to add the asteroid in. After i imported the model i made in the 3D workshop i added the Rididbody and Capsule Collider components, and added a new script to the container.
This is the script that was written:

This added a random rotation to each instance of the asteroid.
Dat Tho...